
PHOTO MECHANIC & PHOTOSHELTER WORKFLOW
Boyd’s Station | Project 306.36 (ver. 11/2026)
Canon USA supports Project 306.36 by providing photographers and writers with professional equipment for use during the supported program. We insist that all participants utilize this equipment for this project in order to achieve professional overall results.
This is a project with a mission to document the people and places of Harrison County. You must be curious, adventurous, and adapt to getting up early and working late in the short duration of time in Harrison County.
Use your time wisely! Get out and document and meet people around Harrison County.
RULE #1 - If you are spending more time at the house during the day, getting behind in captioning, and not out shooting, you need to seek guidance and communicate with the Boyd’s Station Project 306.36 team for help.
Don’t fall into the trap of only shooting during the mornings and evenings and importing during the day. Attempt to photograph each section of light, varying what time of day you set aside to import/caption/upload.
Always carry your cameras with you.
You must set your cameras to the correct date and time immediately.
Set camera to Raw + JGP (largest) - Always Shoot RAW + JPEG.
Shoot in sRGB color space on each camera.
Enterprise Photos/Singles/Features/Portraits are the emphasis. Stories and essays are absolutely encouraged, BUT you can’t fall into the routine/trap of only spending your time focusing on that one specific story for weeks at a time while not actively exploring and photographing people and places around Harrison County. We want to see daily enterprise and singles depicting the diversity of the people and life around Harrison County.
Take advantage and use the 24-70mm and the 70-200mm and long telephotos daily. Enjoy the primes, but never leave the house without a long zoom.
Use PhotoMechanic and Boyd’s Station-supplied XMP to ingest and caption images before archiving. This is important and must be followed.
DOWNLOAD THE PROJECT 306.36 XMP FOR PHOTOMECHANIC IPTC USE HERE: https://drive.google.com/file/d/17Q4Sj7ovUAs2yyY6k2wL9t72T2beFZta/view?usp=sharing
YOU MUST INGEST CARDS FROM CAMERA - AT THE VERY LEAST ONCE EVERY DAY - to computer & hard drive on days that you are shooting. Goal is to have you shooting at least 5 days a week during your time in Harrison County.
Ingest all images via PhotoMechanic, with the RAW and JPEGs combined (you will see an option to break out the JPEG from the RAW; DO NOT DO THAT). Upon ingesting, apply the custom Boyd’s Station XMP template with a detailed, long-form caption to all the photographs you import (more on this below).
Go through each file ingested into archive folders to tweak your already-set batch caption, adding names of people in each image, adding sentences, removing sentences, and making captions more complete and informative. At a BARE MINIMUM, beyond the batch caption, add the unique names of people photographed to every single photograph. If you do it this way, your caption and data will apply to both the JPEG and RAW file.
FULL AND COMPLETE CAPTION GUIDE INFO CAN BE FOUND HERE: https://www.boydsstation.org/caption-guide
You will upload the RAW and JPG to the Boyd’s Station Project 306.36 online archive for mentors and editors to see the work.
If you tone any image, make sure you save a copy and add “ _toned” to the original file name in order for editors to locate the original file, if needed.
Ingest/Save RAW+JPEG images FULLY captioned to the provided external hard drive. (FOLLOW THE OFFICIAL WORKFLOW). This drive will be collected and used as a backup archive containing all your RAW and JPG images.
The Project 306.36 provided housing in Boyd has high-speed internet provided. There is no excuse for saying that the Boyd House does not have fast internet and cannot upload your work.
Daily Update and notify, via the provided Google form and sheet, your uploads and your status with a check-in at the end of each day. Fill out this form with detailed info and story and subject summary for each person or event you photographed that day. This will be a space to add contact information and details that will allow editors and others to follow up with people photographed in the future. We can offer insight and advice as we watch and see your work upload over the summer.
All images must be saved to the Boyd’s Station provided hard drive as your main archive for the summer. (JPG + RAW). This is the master drive, and it should have all images and all captions complete for all images.
Save any folders of saved video, docs, toned and edited versions of your work as well to this drive. Keep that drive safe and updated and it will be given directly to Project 306.36 editors. When that drive is handed over to an editor, it should be the complete archive of your work, completely captioned for an editor to pull from for any needs. Do not be afraid to run out of storage; never delete ANYTHING. Every photograph you take should go on this drive. If you need more hard drives, they will be provided.
NO post-editing should be done that will overwrite the original images stored in your Boyd’s Station archive folder or provided hard drive. We encourage you to edit daily and tone selects as you like, but if you would like to tone any images yourself:
Caption all images first before any toning and saving as _toned.jpg.
Download and do any toning and cropping you like to that downloaded image copy file.
Then upload that toned/cropped file with “_toned” added to the original filename to your toned gallery in your Boyd’s Station Photoshelter Archive library.
NEVER change original file names of any ingested original file.
Always keep the original file name and add “_toned” to the end of the copy file name if you edit from the original file and then save as a new file.
It is also recommended that you keep a copy of your archive on another personal hard drive of your own choosing as an additional backup to the main archive drive. That will allow you to keep your work after you depart Kentucky.
Example of renaming a file you download or copy to tone and edit:
Original file name: 6_21_21_Jack Gruber_218.jpg
Edited and toned file name: 6_21_21_Jack Gruber_218_toned.jpg
Behind the Scenes (BTS) of participants or friends of the program
Any image that you shoot that shows members of Project 306.36 doing things as a group, or individually or showing “behind the scenes” fun and interesting images of the summer, ALWAYS tag these images in IPTC keyword field with: “bts” and “behind the scenes” in keywords. Also add names of persons in the photos in the people shown field as well. This will make it easy to search for social images of people doing things involving Project 306.36.
Please add any BTS files that are captioned and toned as you like to the overall Boyd’s Station Archive Libary BTS gallery.
Ingest Settings Setup in PhotoMechanic - INITIAL SET UP
The Boyd’s Station Project 306.36 program workflow and expectations will be discussed in detail during onboarding sessions before arrival in Kentucky, as well as in-person training during the first week of residency, providing camera tutorials, workflow, and archive expectations. PhotoMechanic and Adobe Photoshop are the preferred file management tools. Please be sure to have a computer with available memory that is capable of editing and connecting to the online archive.
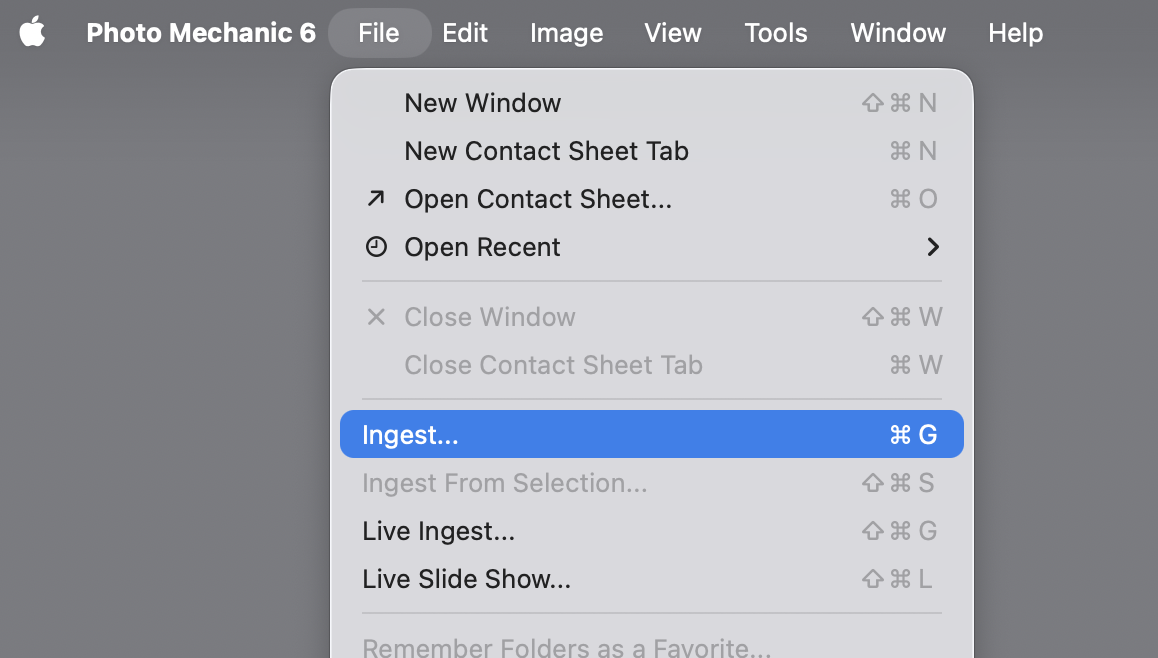
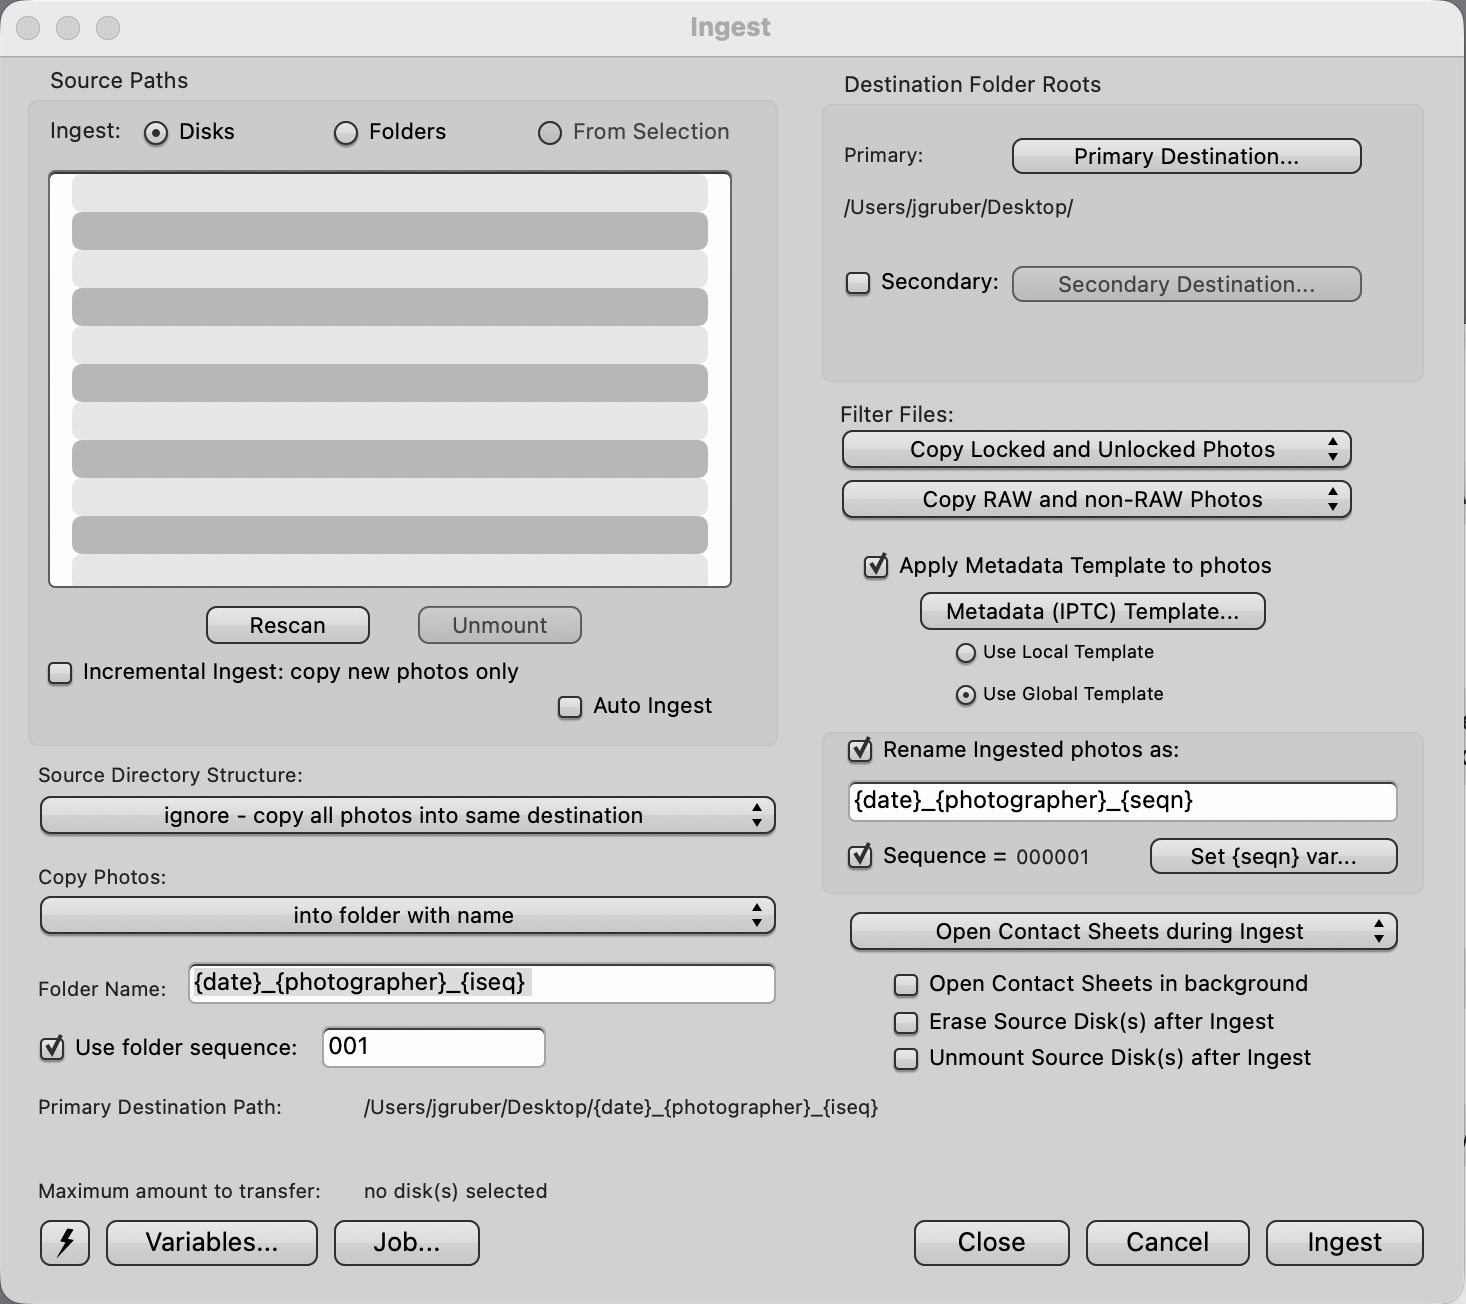
Set up Ingest in PhotoMechanic
Once this is set up. You will never do anything else to this template while in KY except start daily ingests via the “ingest” button.
Source Directory Structure: Select: ignore - copy all photos into same destination
Copy Photos: Select: into folder with name
Folder Name: {date}_{photographer}_{iseq} (TYPE OR CUT/PASTE EXACTLY)
Check: use folder sequence (start at 001 and NEVER CHANGE AGAIN)
Destination Folder Roots: Select Primary Destination (Create folder on hard drive)
Filter Files:
Copy Locked and Unlocked Photos
Copy Raw and non-Raw Photos
Check boxes: Apply Metadate Template to Photos, Click: Use Global Template
Check box: Rename Ingested photos as: cut/past or type exactly the following: {date}_{photographer}_{seqn}
Set Copy photos to “into folder with name” and type or cut/paste the following EXACTLY in Folder Name: {date}_{photographer}_{iseq}
Check box: Sequence and click Set (seqn) var… and click reset. (NEVER CHANGE THIS NUMBER AGAIN)
Check box: Sequence = (and click set {seqn} var…. and reset to 000001 (NEVER CHANGE THIS NUMBER DURING YOUR STAY IN KY)
Check box: Use folder sequence and type in: 001 (NEVER-NEVER-NEVER CHANGE THIS NUMBER DURING THE DURATION OF YOUR STAY IN KENTUCKY – DO NOT CHANGE; LEAVE IT ALONE - THIS NUMBER WILL TICK UP INCREMENTALLY ON EACH INGEST)
Save your new ingest profile by clicking the lightning bolt button (bottom left).
Using PhotoMechanic - Ingesting from camera cards to Project 306.36 hard drive
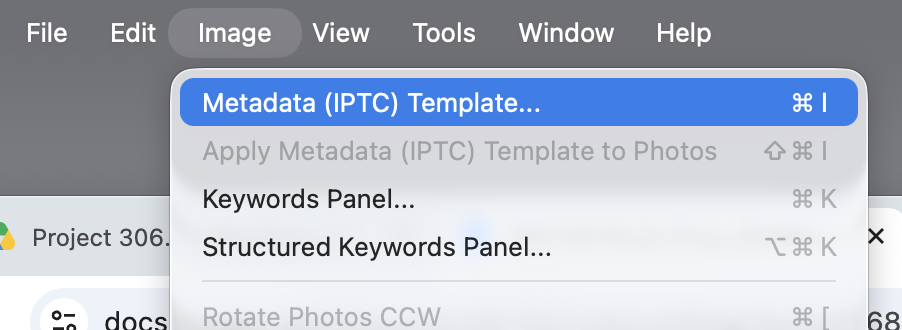
YOUR VERY FIRST TIME INGESTING AT BOYD’S STATION - Open PhotoMechanic IPTC Stationery Pad, click “Clear” and then click “Load” to add your provided Project 306.36 XMP template file.
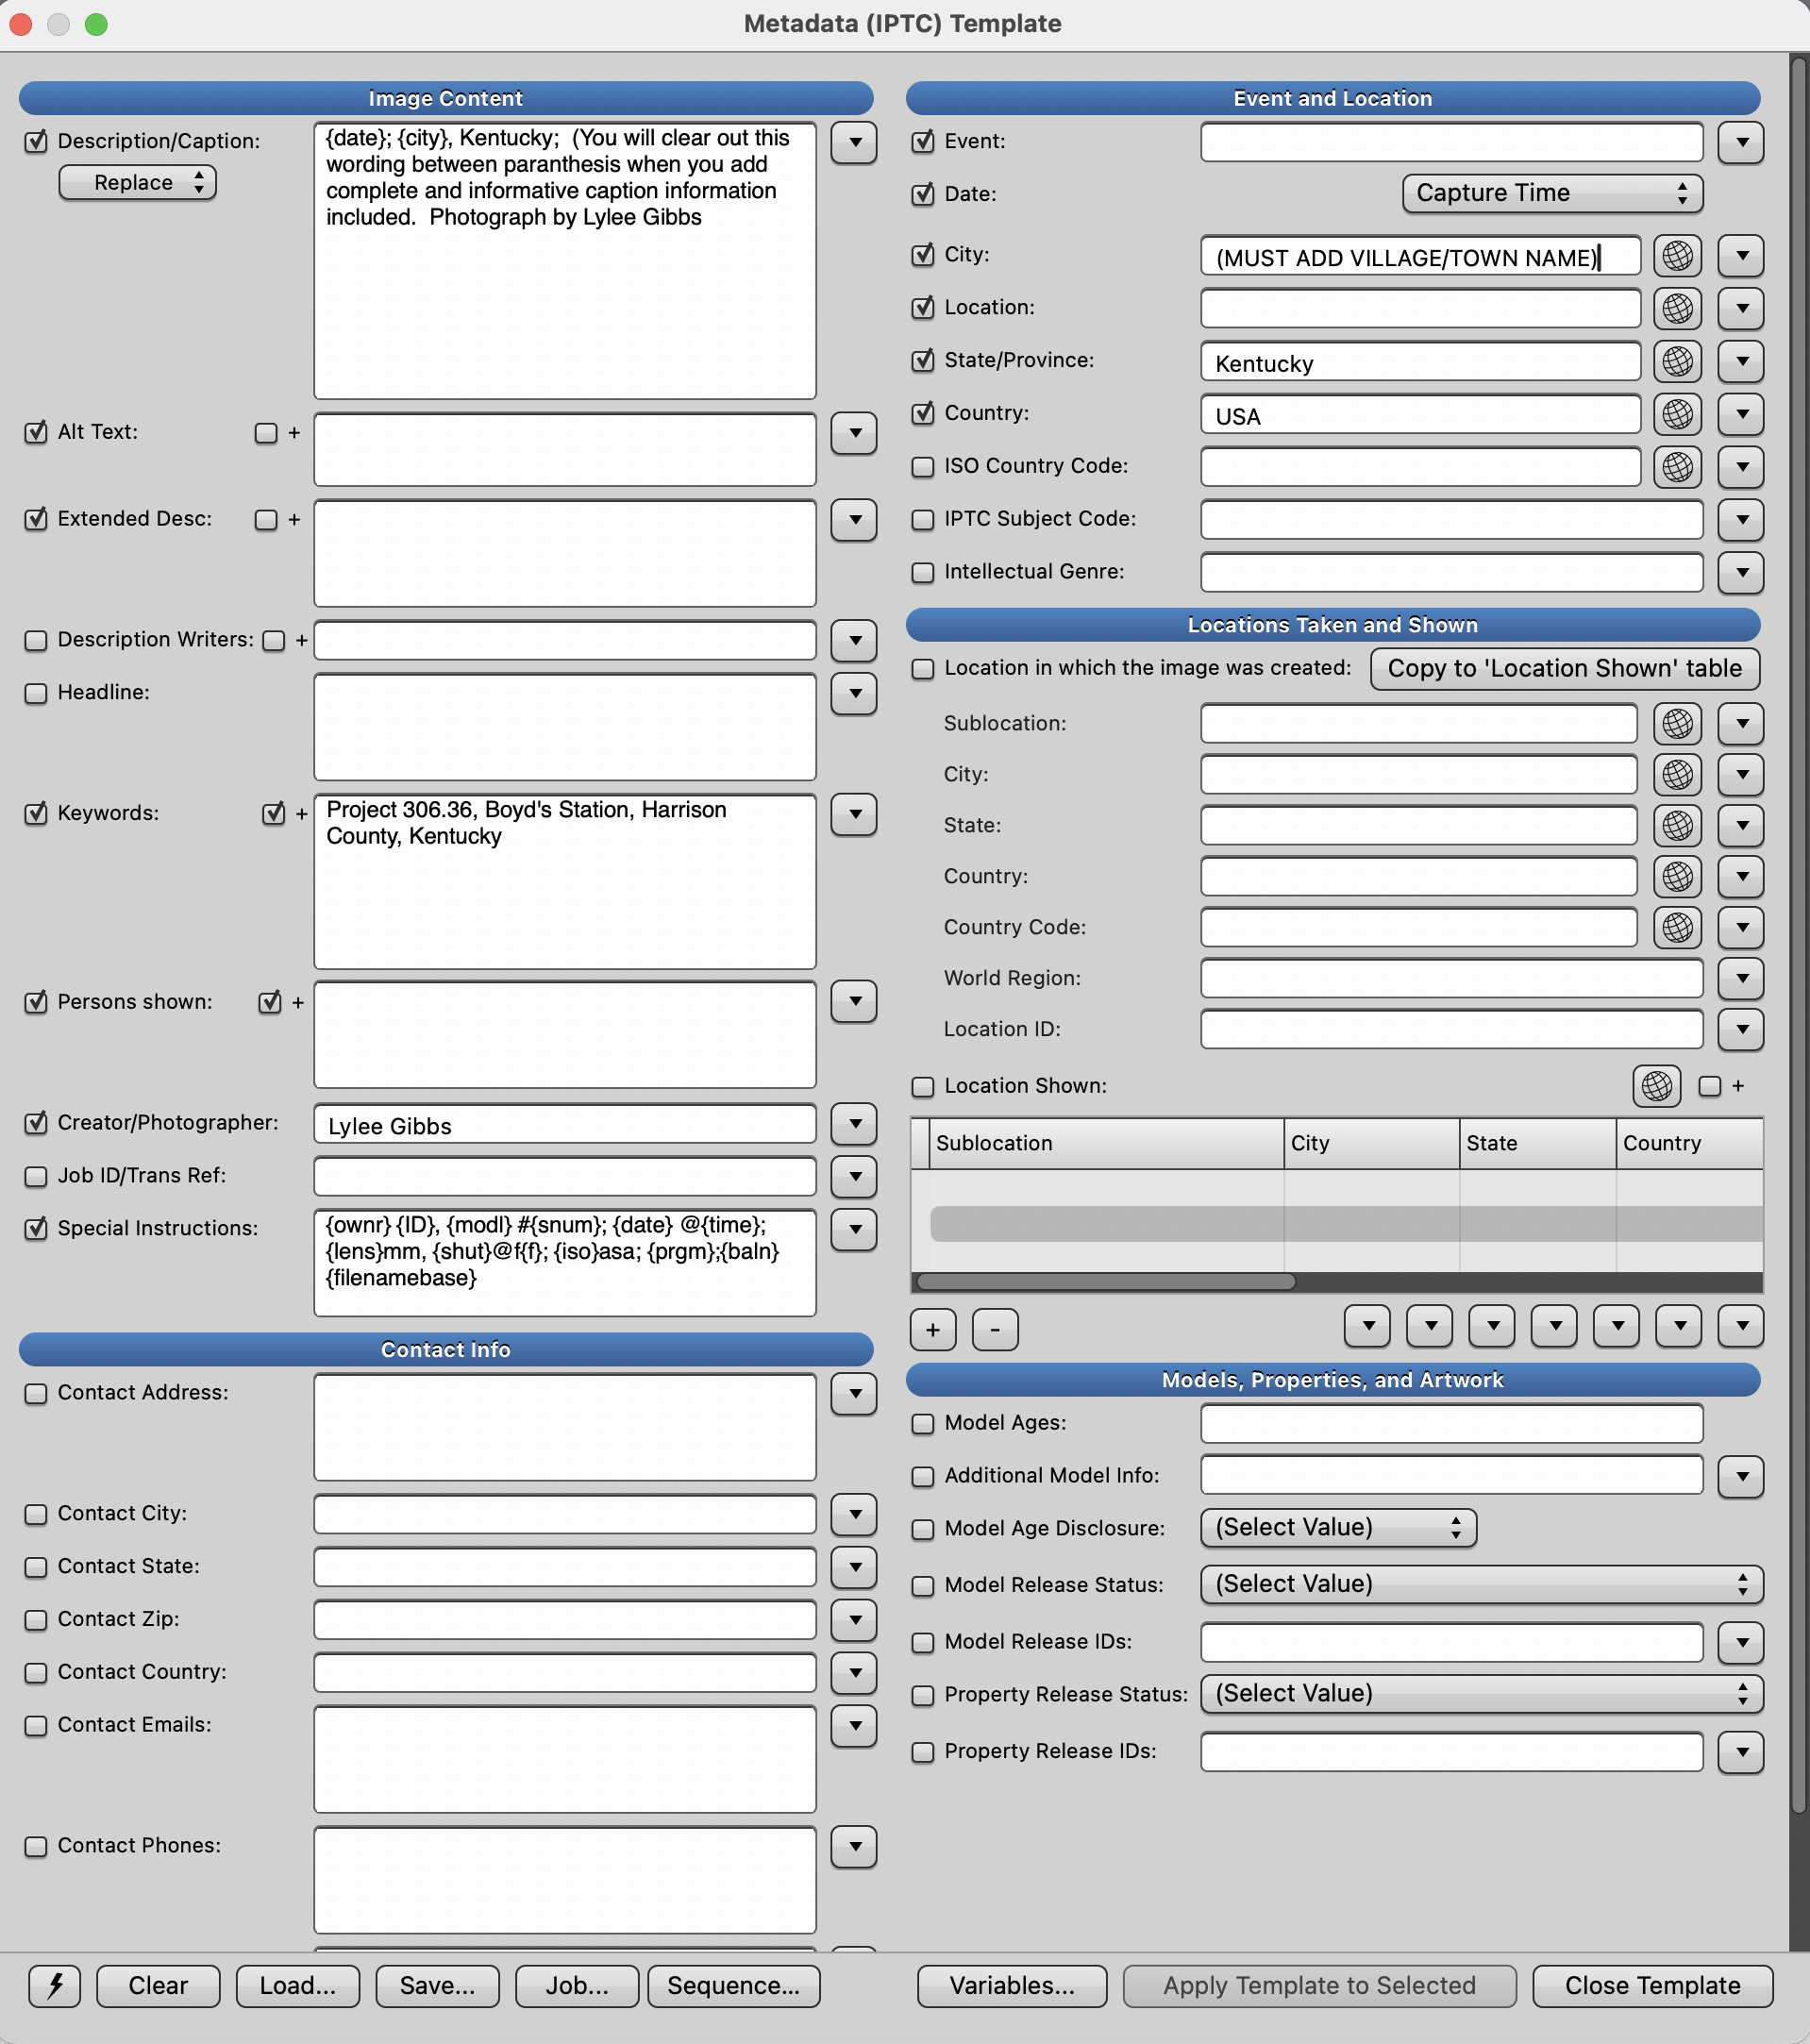
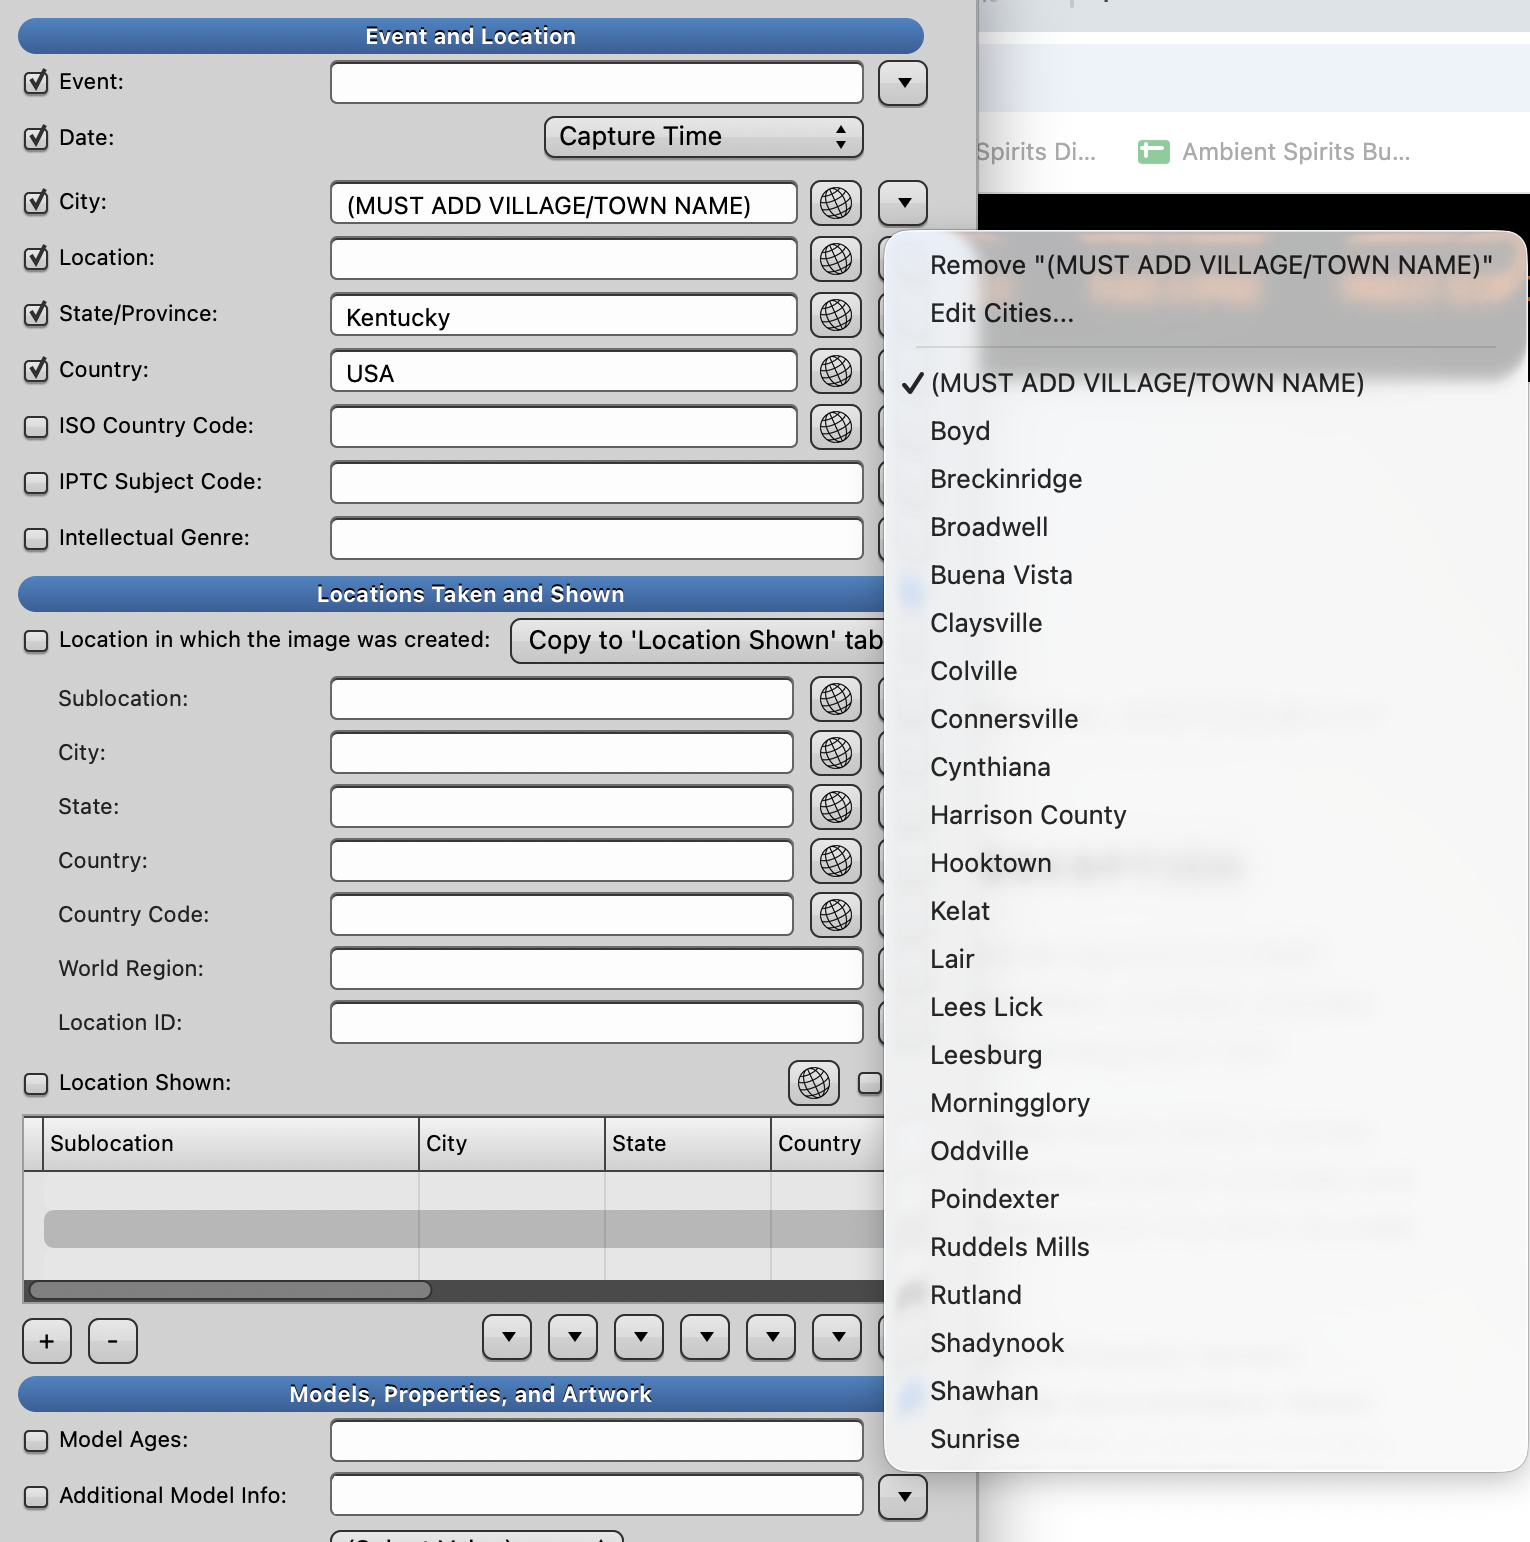
You must select a correct location in the “City” field where it says “ MUST ADD VILLAGE/TOWN NAME” before you start to ingest to be sure a town is specified and correct, to make sure the proper location of the photos shot is detailed in the IPTC info overall. You may have to go in and edit in different town names when needed after ingest if you photograph different locations during the day.
Before ingesting, create a basic caption template in the Description/Caption field of the IPTC template with as much caption information as will be appropriate for the images to be ingested. Either write and replace in the caption field or copy and paste from a word or notes doc.
IPTC Original Template is the starting point - This was loaded at set up
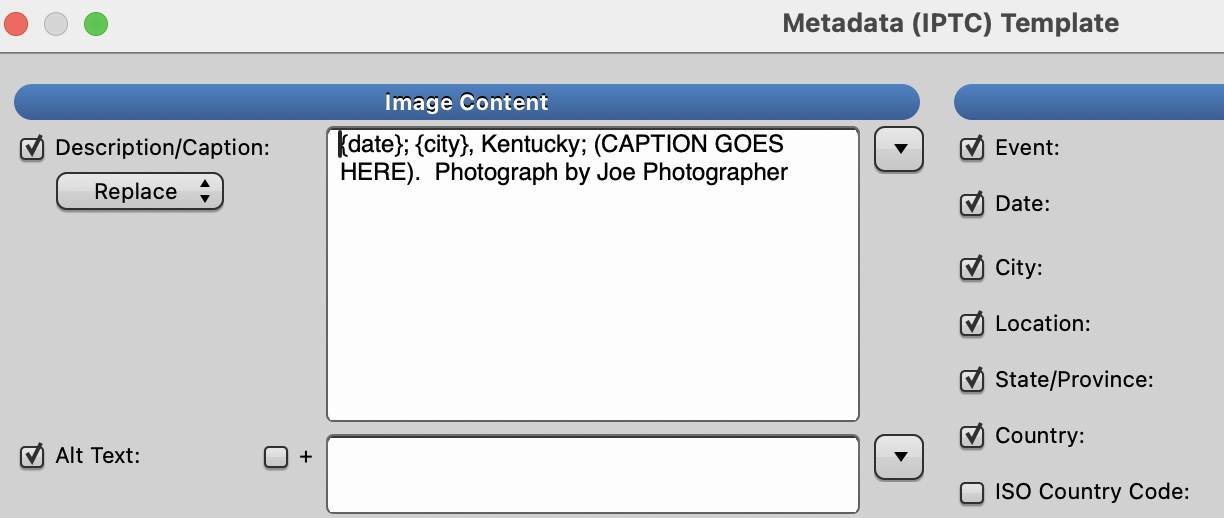
Adding Basic Caption and select City/Town in IPTC Template before ingesting
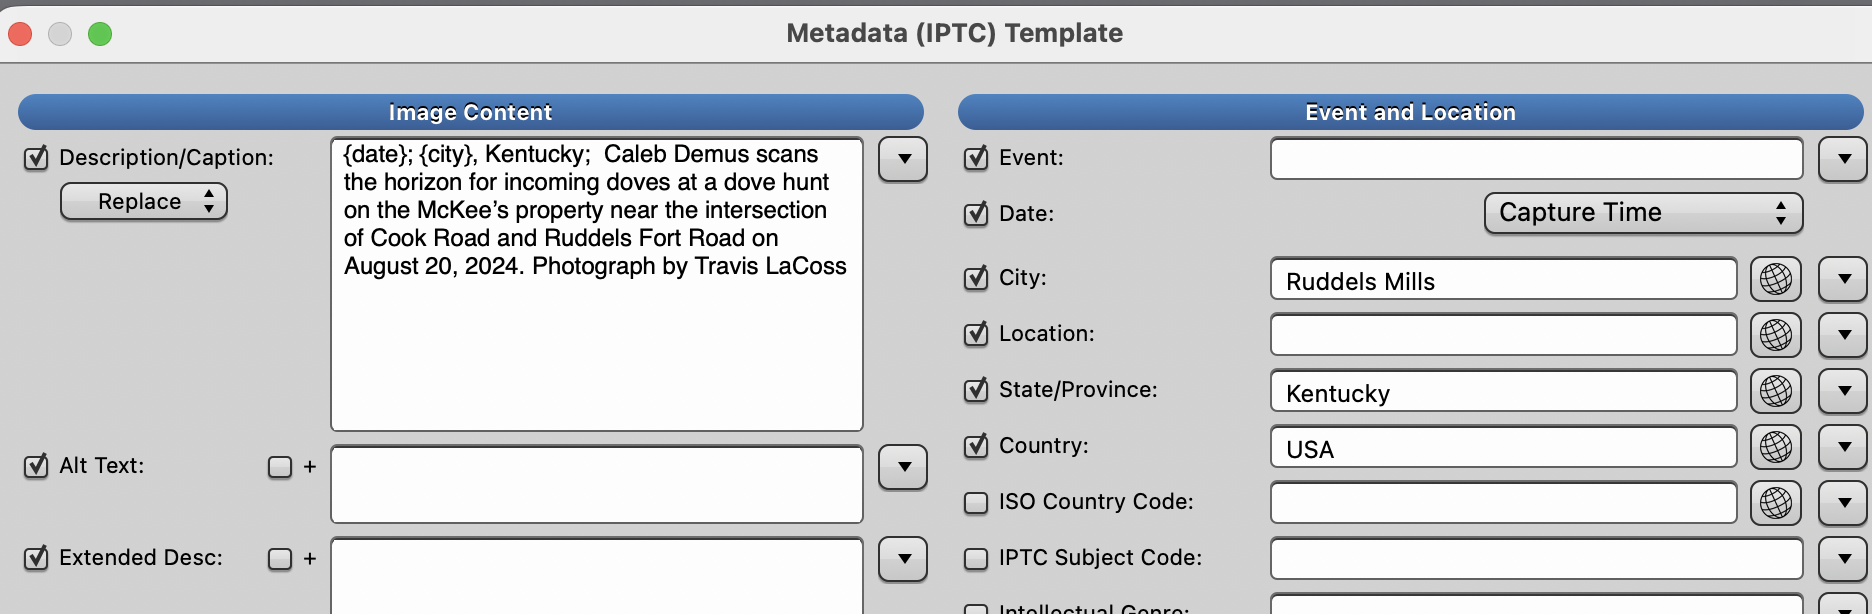
Go ahead and close template at this time…..and move on to ingesting
You have updated IPTC information before ingest. You are now ready to ingest.
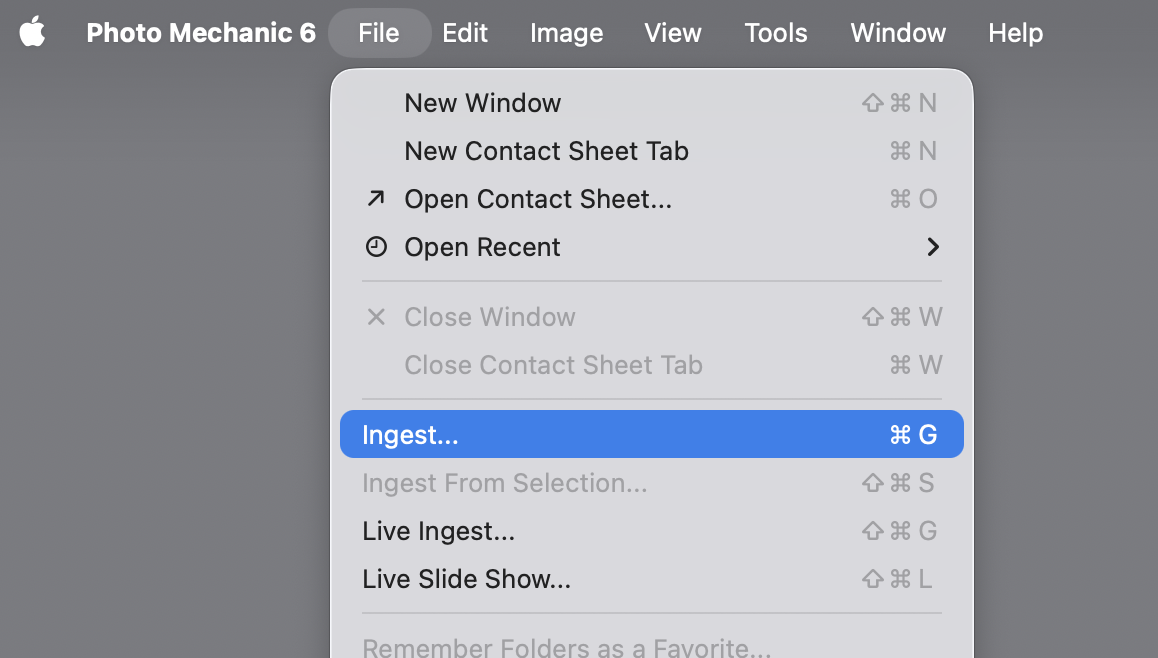
Start your ingest from card to hard drive now
Pull down File > Ingest
YOU HAVE ALREADY COMPLETED THE INITIAL SETUP (LEAVE AS IS AFTER FIRST SETUP) - Set Primary Destination to a new folder on your provided hard drive called [YOUR NAME]_[YEAR] Project 306.36 ARCHIVE.
Example: Miles Miller_2026_Project 306.36 Archive
Select/Highlight “CARD” that is to be ingested > Click Ingest
Inside the Primary Destination folder, your daily ingests of each card from each camera will populate inside that folder with the correct naming configuration if you have followed the setup steps correctly.
As photos ingest, each photo ingested should now have attached XMP IPTC information from your initial information loaded prior to ingesting.
Following ingest, you are now ready to go in the folders on the hard drive archive and fine-tune all captions with more complete and unique-to-each-image caption info, and check that each city/town is correct and provide details beyond the basic information already populated in the fields. Remember the who, what, where, when, and why you are photographing these subjects or locations. Add contact details and exact location info in specified areas for editors to locate and contact people in the future. THIS IS VERY IMPORTANT.
Be sure to check city/towns of each image, as you may have different locations shot on a single ingested disk. Also, remember to include full and complete captions for all images. Keywords added are very important to describe what is happening in the photo to make it more broadly searchable, as are the names of people shown.
NOT EVERY PLACE OR PERSON PHOTOGRAPHED LIVES IN CYNTHIANA OR BERRY. YOU MUST BE DILIGENT ABOUT DETERMINING WHERE YOU ARE IN THE COUNTY.
First, double-check that the City field is correct with the right town or village where you were shooting. If you shoot in different areas of the county, you may have different towns on a single card that was ingested.
Remember, many people will tell you their mailing address of Cynthiana or Berry, Kentucky when asked where you are at that moment. Getting people's addresses and the location of the place you shot with a mailing address is important. DO NOT put that in the caption, but place that info in the IPTC field of Contact Address along with phone numbers and emails (if possible). This does help locate places in the future but this does not directly determine for caption information the specific town or village location in Harrison County.
Determining where in the county you are located is more exact; ask what town or village, or check county maps to determine where you are. There is a drop-down menu in PhotoMechanic “City” with all the local incorporated and unincorporated towns and villages to use.
A lot of your photographs will be on county roads, and you might lose track of which community you were in. Other than the Geo-tag feature in the camera, a good solution to this might be taking a quick picture on your iPhone to keep a map pin handy (you can see the location of photos in your photo app as well as generating a geo-tag with coordinates).
Detailed captioning following ingesting cards
Add detailed info to Caption field:
Describe in the present tense who is pictured and what is going on within the photo.
Name the city and state where the image was made. Note: use the U.S. Postal Code abbreviation in the caption and spell out the state of Kentucky in the State/Province field in the Metadata Templates. Kentucky should be Kentucky in the State/Province Field of the IPTC Template.
Provide the date the photo was made, including the day of the week, and preceded by a comma. (e.g., Tuesday, Jan. 27, 2015).
Make sure you finish each caption with your byline, which is added when you ingest your images automatically. Example: Photograph by “your name”
The above elements are mandatory, and no caption is complete without all of them. Names should be listed in order, left to right, unless it is impossible for the caption to read normally otherwise. With multiple people identified within the caption, enough representations to place them are necessary so there is no confusion as to each subject’s identity.
Additional caption information, such as illustrating quotes and color from people who provide more detail and information for the images, is highly encouraged.
Captions must also give attribution for action not seen (e.g., the scene of an accident where several people died, according to police).
6/01/2021 - Boyd, Kentucky - Myrtle Gruber, 80, confronts L. T. Jones, Jr., a CSX railroad worker, about cutting down her pine trees along the tracks outside her home in Boyd, KY, on Tuesday, June 1, 2021. Gruber planted the trees to screen the tracks and says, “I watered them by hand during a summer drought.” Jones said he was told the trees were too near to the tracks and needed to be removed. Photo by Taylor Meinke
Please look at your captions as someone looking back on your work 100 years from now, wanting to know who is in the photos as well as where the photo was actually taken in greater depth than just the town.
Add keywords that are obvious and important in the photographs that would only be searchable through SEO keywords to be found by future searches. If you shoot a photo of a river and tobacco fields at sunrise, think SEO and add keywords like tobacco, farm, field, sunrise, river.
Please add names of people photographed, including contact information such as phone numbers and email address for photographs in the IPTC field “CONTACT INFO” fields.
Any other descriptions of the road or landmarks can be added as well in the “Extended Desc” field.
FULL AND COMPLETE CAPTION GUIDE INFO CAN BE FOUND HERE: https://www.boydsstation.org/caption-guide
Archiving
Once all images are captioned ON YOUR PROVIDED backup collection hard drive…..
Log in to PhotoShelter and create a new collection in PhotoShelter Library, naming it THE SAME EXACT FOLDER NAME (THIS IS VERY IMPORTANT) that is used in your Project 306 Boyd’s Station ARCHIVE collection hard drive.
Upload by dragging and dropping the FULLY CAPTIONED RAWs+JPEGs and original unedited files to the PhotoShelter Archive gallery folder you created and named the same as your hard drive archive.
Toning and Saving Edits
Create a “Toned” folder on the hard drive archive to save any toned files that have been saved with name_toned/jpg.
Keep those toned images in named folders that match the naming configurations used in the named ingest archive folders.
Follow the same steps as above and create an overall folder on the PhotoShelter library and copy the toned images as you tone and edit images.
This is where you WILL add your favorite/best edited images ongoing so that mentors and editors will be able to follow your work. You should only add images to these galleries that have already been captioned and uploaded to your Photoshelter collection.
The toned and edited file will need to be saved differently than the original. Use the same file name PLUS the addition of “_toned” to the filename to preserve the original file. DO NOT OVERWRITE THE ORIGINAL FILE
Original file name: 6_21_21_Jack Gruber_218.jpg
Edited file name: 6_21_21_Jack Gruber_218_toned.jpg
After the filename has been saved to _toned, you can now upload that file to your “toned” folder or anywhere else you want to display it or share it.
You can create new galleries for any individual photo stories or essays or any gallery of images you would like to highlight to show mentors/editors.
Please add any behind-the-scenes images or clips to your Behind The Scenes gallery. Always remember to add the BTS and Behind the Scenes to the keywords in IPTC when captioning.
These are the only places on PhotoShelter where you should be uploading any images that have been edited.
Any essay galleries you would like to build with edited and toned images must use the same workflow and file naming as the Folio Gallery workflow.
Remember, all images in the OVERALL archive folder should be unedited. We want to always keep the original files with captions untouched..